Wednesday, June 27, 2012

Calling Lego Fans!


If you have not discovered Build with Chrome, you need to check it out. Be sure to read the House Rules. There is helpful information that will make your exploration less of a headache.  
Click below on the links to start exploring! 


Friday, June 15, 2012

Getting Started with Google Apps


Typing - Extra Practice


Our Goals . . .
  • 3rd Grade - 10 WPM & 90% Accuracy 
  • 4th Grade - 15 WPM & 90% Accuracy 
  • 5th Grade - 20 WPM & 90% Accuracy 
  • 6th Grade - 25 WPM & 95% Accuracy 

Are your hands on the HOME ROW?

  • Left-hand fingers should be resting over the AS, D, and F keys.
  • Right-hand fingers should be placed over the JKL, and keys.
  • Your thumbs should either be in the air or very lightly lying on the space bar.


Links for Extra Typing Practice
     Click on the links below for helpful sites to keep typing skills fresh.
     (All programs are web based and don't have to be downloaded.)

Dance Mat Typing

This is a fun site for beginners learning how to type. Start with Level 1 and follow the directions.
Then, move up to the other levels. This site does not time the user and is an engaging, low stress introduction to keyboarding.


Keybr.com

Keybr.com is very straightforward. You can choose from three basic lessons that start with a certain number of keys on the keyboard, and then, as you progress through the lessons, more keys are introduced to the mix to make things a little tougher. 


Type Racer - Play your friends!


Power Typing
Our tutorial is designed to teach, develop and practice, step by step, typing skills. Separate lessons are written for Dvorak and Qwerty. One should go through lessons in sequence because they rehearse keys already learned as they add new ones. Instructions for hand positioning over a keyboard are included in lessons.


Keyboarding Practice Drills

Keyboarding practice is more of a traditional typing program. Those of us that studied business education classes while in high school will remember these drills. (aa ;; ss ll dd kk ff jj) It works. Some students will find this rewarding because student paced. Have the student work through the lessons as listed.


E-learningforkids.org

E-Learning for Kids has a space theme that makes it fun for kids to practice their keyboarding skills. Games can be unlocked as typists move on to higher levels. Includes computer and mouse basics for younger learners. Note: Background music can be changed or switched off.


Sense-lang.org

Sense-Lang has a nice tutorial interface with an interactive keyboard that highlights the keys you missed. WPM and accuracy are calculated as you type. There are also some fun and entertaining games.


TypingMaster

Typing Master is a site to go to for 3 great games, including, my favorite, KeyMan Typing. There is also a great 1-3 minute typing test.


Peter's Online Typing Course 

Welcome to this humble course. Here you'll find a set of free online typing lessons and typing exercises for beginning typists, and frustrated hunt-and-peckers who want to move from four-finger typing to full-blown touch typing.


Artypist.com 

This is a portal providing an online free typing course, created for help you in learning, improving and mastering the art of typing.


Free Typing Lessons 

A complete interactive typing tutor to learn to type. Learning to type has never been easier. We teach 2 keys at a time, followed up with a review of all the keys in the previous lessons.


Keyboarding Games for Kids

These fun free typing games are a great way to continue building a solid typing foundation.
Scroll down and you will find several game options.


Typing Games


Feel free to leave a comment below 
with other keyboarding sites or games that you enjoy! ")

Rapid Repair Guide


IPOD - IPHONE - IPAD - REPAIR GUIDES & TROUBLESHOOTING HELP:

Below you will find extensive content to help revive your iPod if you are experiencing problems starting your iPod. We have also included Repair Guides designed to help you replace & repair parts inside your iPod.


Five R's:
If you're having trouble with an iPod, try these steps (known as the five R's) one at a time until the issue's are resolved. These steps can help revive a troubled iPod and save time and money you would otherwise spend on parts/labor.
Note: Please make sure that your iPod is fully charged and toggle the Hold switch on and off before performing these steps.
  • 1. Reset your iPod (1st, 2nd or 3rd Gen), iPod nano (1st or 2nd Gen), iPod video (1st or 2nd Gen), iPod mini(1st or 2nd Gen), or iPod shuffle(1st or 2nd Gen). Holding Menu + Center buttons for at least 6 seconds normally will reset your iPod. Hold Menu + Play on the 3rd Generation iPod to perform a reset.
  • 2. Retry your iPod with a different USB or FireWire port on your computer (please note that the latest iPods can only be synced through USB: iPod Video & iPod Nano).
  • 3. Restart your computer, and make sure that you have the latest software updates installed.
  • 4. Reinstall your iPod and iTunes software. You can download the latest versions of iPod Updater and iTunes from Apple.com.
  • 5. Restore your iPod using the latest iPod Updater. Please note that restoring an iPod will erase all songs and files on your iPod and restore it back to its original settings. After restoring, you can transfer your music and files from your computer back to your iPod again.

How 2 Tips - Teachers


Laptops and Projectors: How to, Tips and Hints


LearnFree.org - Computer Tutorials


Microsoft Office 2010 Tutorials


How to create a spelling test using Excel


How to create time tables practice sheets using Excel


W3Schools.Com - Online Web Tutorials - Web Development Beginner to Expert


Teachers are known for their organizational skills, so chances are they’ll love Pinterest‘s intuitive and logical design. The social network’s user experience has helped it earn a top spot among today’s most popular social networks. Therefore, we predict that teachers will give it a gold star, too. Our friends at OnlineUniversities.com have put together the following infographic, which details how teachers can use Pinterest to organize lesson plans, distribute curricula, collaborate with other faculty, and even encourage student participation.

Can-Do Robots


Can-Do Robots


Total Time Needed:
2-3 Hours
These friendly robots are more than just good-looking; magnets hold their features in place, making the 'bots the metallic equivalent of a Mr. Potato Head.

Materials
  • Tin can
  • Electrical tape (optional)
  • Hardware, and various recyclables such as bottle caps, keys, etc.
  • Hot-glue gun
  • Strong disk magnets
Instructions
1.     Open a tin can with a safety can opener so there are no sharp edges. (If you only have a regular opener, line the inside of the can's rim with electrical tape.)

2.     Empty, wash, and dry the can.

3.     For facial features, arms, propulsion devices, and communication arrays, look for items around the house and at the hardware store. We used bolts, brackets, hinges, keys, wing nuts, switches, bottle caps, washers, knobs, and more.

4.     Hot-glue the items to strong disk magnets. 

5.     Be creative, be safe and have fun!  

Here are a few quick steps to take when you first notice a problem. 

1.   Quit. Quit all running programs (see the tip on using Ctrl-Alt-Delete below). If the problem persists, restart the computer.

2.   Turn on. Make sure everything is turned on. This means your computer, monitor, speakers, printer, and anything else connected to your computer. Many mysterious crashes are solved when users check the on switch. If you’re having problems with a peripheral (printer, scanner, modem, and the like), try turning everything off, then turn the peripheral on before turning on the computer.

3.   Check the plugs. Get behind your computer and get to know the cable spaghetti back there. Make sure all the plugs are securely seated.

4.   Check the hardware settings. Is the volume turned all the way down on your speakers? Is the contrast on your display turned all the way down?

5.   Check the software settings. This is a little more complicated, but if you get to know your Control Panels, you can fix many problems. 

6.   Clean house. Give the computer a good cleaning, inside and out. A can of compressed air (available in the Computer Lab) is great for getting rid of dust.

If the steps above didn't solve your problem, try to identify the problem yourself.  

1.   What has changed? Your computer used to work, now it doesn't. Is it something you changed? Did you add hardware? Install new software? Can you undo the change?

2.   When does it happen? Try to pin down exactly what makes the problem occur. Does it only happen when you’re using a particular application? Only when you’re saving a document?

3.   What’s the real problem? Make a list of the symptoms without trying to guess the problem. Now try to take a fresh look at the list to see what the problem might be.

Example: Suddenly your computer "freezes"; nothing you do can make the computer go. Looks like something serious is wrong with the computer, but probably the computer is fine, and someone has knocked your keyboard and mouse cables loose.

Keys to Happiness
There are a few key combinations that sometimes help solve problems.
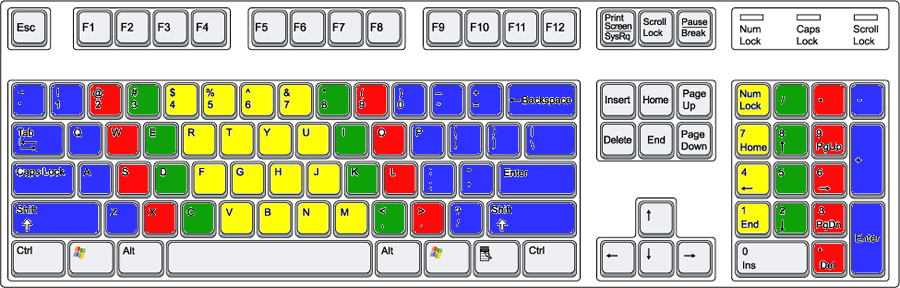
  • Esc: This key is located in the upper left-hand corner of the keyboard, and is called the "Escape" key. Tap this key once, and whatever application you’re running may stop what it’s doing. If nothing happens, tap it a few times.
  • Ctrl-Alt-Delete: The Ctrl (called "Control") and Alt (called "Alt") keys are located on either side of the space bar. The Delete key is located to the right of the main keypad area, below the Insert key. Hold down the Ctrl and Alt keys and tap the Delete key. Windows will bring up a list of everything it’s doing. Click on the application you think might be causing you problems, then click on the End Task button. Windows will throw that program out.
From:
http://www.techtrain.org


Another good source for basic PC troubleshooting: http://www.internet4classrooms.com/support.htm

_________________________________________________________________________________


Quick IT Tips

TO RECOVER DELETED DESKTOP RECYCLE BIN
1.      Click Start, and then click Control Panel.
2.      Click Appearance and Personalization, click Change desktop icons.
3.      Click to select the Recycle Bin check box, and then click OK.